Overview
Custom API actions let your AI agents integrate with external systems during conversations. Your agents can retrieve customer data, update CRM records, check inventory, create tickets, and execute business logic - all in real-time while talking to customers.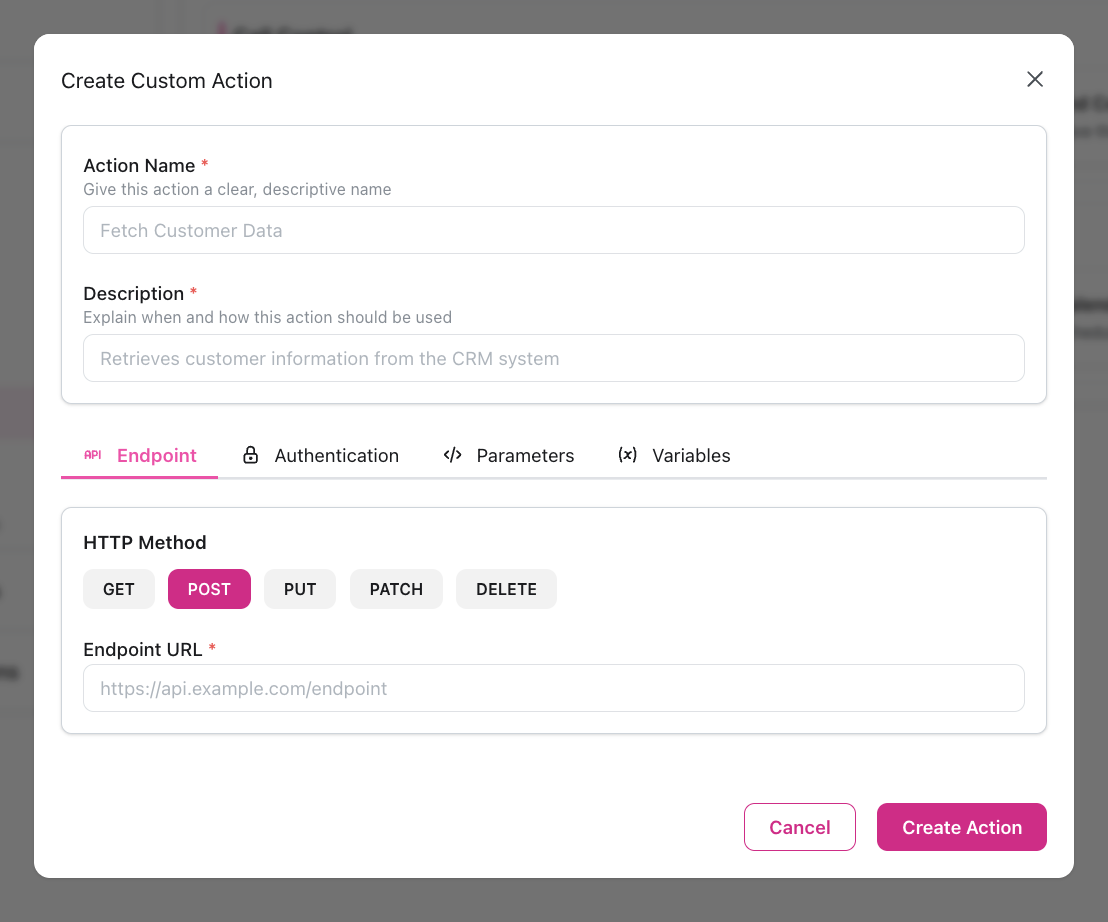
- Configure the API endpoint - Set up HTTP method, URL, authentication, headers, and request body
- Define variables - Specify what information the agent needs to collect before calling the API
- Agent uses it - During conversation, agent collects the variables and calls your API
- API responds - Your system returns data that the agent uses to continue the conversation
Custom actions execute synchronously during conversations. For operations that don’t need immediate responses (logging, analytics, post-call processing), use Webhooks instead.
Example Flow
Secure Example with Verification
For sensitive data lookups, verify customer identity first:- First action: “Verify Customer” - authenticates using customer ID + PIN/password
- Second action: “Lookup Order” - only executed if verification succeeds
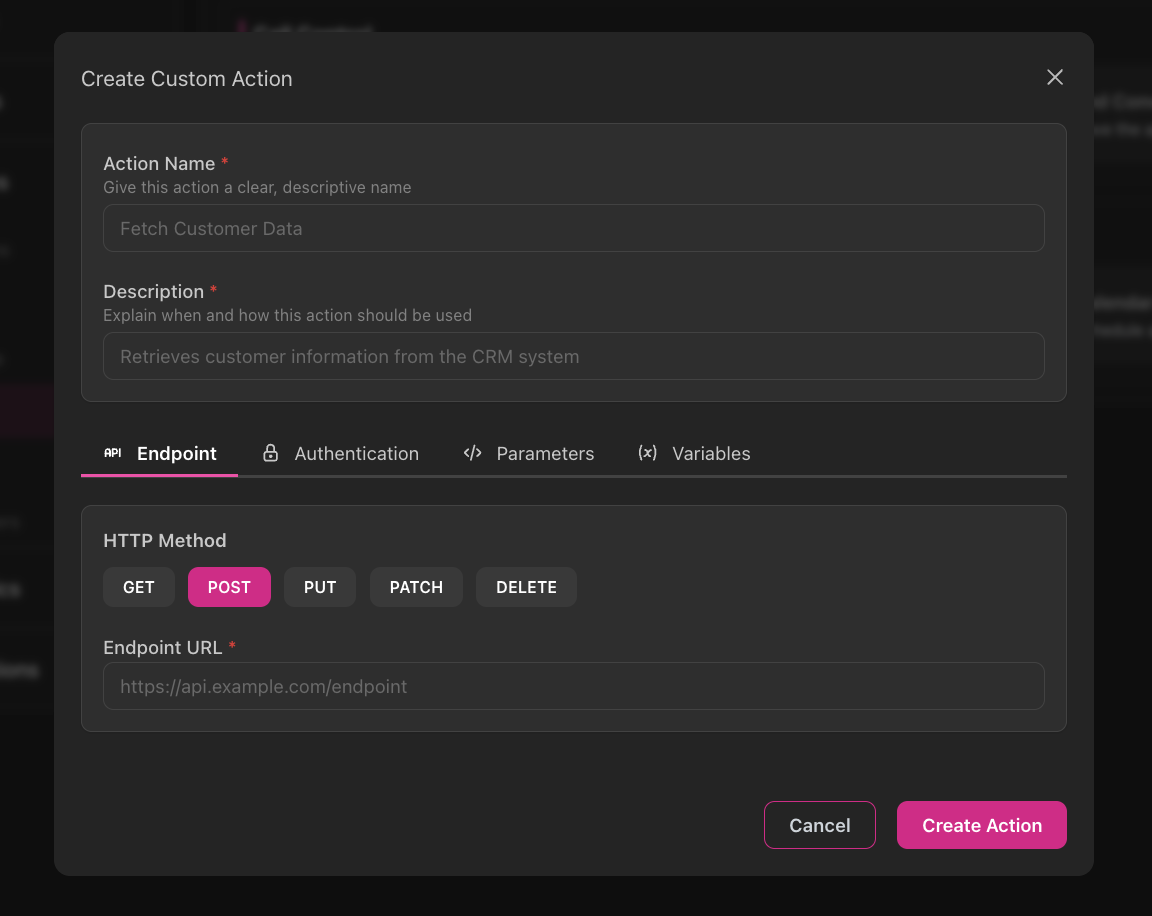
Creating a Custom Action
Configure Basic Info
- Name: Descriptive name (e.g., “Lookup Order Status”)
- Description: When to use it (10-200 characters)
Configuration
Endpoint Tab
HTTP Method (Required)- GET - Retrieve data
- POST - Create records
- PUT - Replace entire records
- PATCH - Update specific fields
- DELETE - Remove records
- Full API URL:
https://api.company.com/customers - Supports template variables:
https://api.company.com/orders/{{order_id}} - Auto-prepends
https://if no protocol specified
Authentication Tab
Choose authentication type:None
None
No authentication requiredUse for:
- Public APIs
- Internal endpoints on private network
Bearer Token
Bearer Token
Most common for modern APIsConfiguration:Use for:
- Token: Your API token/JWT
- OAuth 2.0 access tokens
- JWT authentication
- Modern REST APIs
Basic Auth
Basic Auth
Username/password authenticationConfiguration:Use for:
- Username: API username
- Password: API password (masked with bullets when editing)
- Legacy APIs
- Simple authentication
Header
Header
Custom header-based authConfiguration:Use for:
- Header Name: e.g.,
X-API-Key - Header Value: Your API key (masked when editing)
- API key authentication
- Custom auth schemes
Body
Body
Credentials in request bodyConfiguration:Use for:
- Parameter Name: e.g.,
api_key - Parameter Value: Your credential (masked when editing)
- Non-standard auth schemes
- Login endpoints
Parameters Tab
Headers- Add custom HTTP headers (key-value pairs)
- Example:
Content-Type: application/json
- Add URL query parameters (key-value pairs)
- Example:
include=orders&limit=100
- JSON textarea with Monaco-style font
- Supports template variables:
{{variable_name}} - Validates JSON structure while allowing variable placeholders
Variables Tab
This is the most important part. Variables define what information your agent needs to collect before calling the API. Each variable creates a function parameter that the LLM sees and collects during conversation. Variable Fields:- Name: Variable name (e.g.,
order_number,customer_email) - Type: string, integer, float, boolean, date, email, phone
- Description: What this variable is for (helps the LLM understand)
- Example: Example value (guides the LLM)
- Required: Toggle - if true, LLM must collect before calling API
- Default Value: Used if not required and not provided
Using in Instructions
Reference the action by name and explain when to use it:Variable Collection
The agent automatically collects required variables before calling the API:Using Optional Variables
Template Variables
Use{{variable_name}} syntax in URLs, headers, query params, and request body.
Action Variables
Variables you defined in the Variables tab:Context Variables
Available automatically from contact record and call context: Contact Information:Type Conversion
Variables are automatically converted to their defined types:integer→ number in JSONfloat→ decimal in JSONboolean→ true/false in JSONstring→ quoted string in JSON
Testing
Test Endpoint Independently
Use Postman or cURL to verify:
- Endpoint is reachable
- Authentication works
- Request format is correct
- Response is as expected
Start with Static Values
Configure action with hardcoded values first (no variables)Verify basic functionality before adding complexity
Add Variables
Replace hardcoded values with variablesTest with contact record that has required fields
Test in Agent
- Start web call
- Trigger the action through conversation
- Verify agent collects variables correctly
- Check API is called with correct data
- Confirm agent uses response appropriately
Troubleshooting
401 Unauthorized
401 Unauthorized
404 Not Found
404 Not Found
Cause: Incorrect URL or resource doesn’t existSolution:
- Verify endpoint URL is correct
- Check template variables populate correctly
- Test with static values first
Agent Doesn't Collect Variables
Agent Doesn't Collect Variables
Cause: Variables not configured or unclear descriptionsSolution:
- Verify variables are defined in Variables tab
- Add clear descriptions and examples
- Set required=true for essential variables
- Reference action by exact name in instructions
Variables Not Replacing
Variables Not Replacing
Cause: Incorrect syntax or variable doesn’t existSolution:
- Use exact syntax:
{{variable_name}} - Verify variable is defined in Variables tab
- Check contact record has field populated
- Set default value in Variables tab for optional variables
Timeout Errors
Timeout Errors
Cause: API responding slowly (>2 minutes)Solution:
- Optimize API response time
- Consider using webhooks for slow operations
- Cache frequently accessed data
Agent Can't Use Response Data
Agent Can't Use Response Data
Cause: API returning non-JSON or malformed JSONSolution:
- Verify API returns valid JSON
- Check Content-Type header in response
- Test response with JSON validator
Security Best Practices
Use HTTPS Only
Use HTTPS Only
Always use HTTPS endpoints to encrypt data in transit✅
https://api.company.com/endpoint
❌ http://api.company.com/endpointSecure Credentials
Secure Credentials
- Never hardcode credentials in URLs
- Use authentication configuration
- Rotate API keys regularly
- Use separate keys for testing vs production
- Revoke compromised credentials immediately
Limit Permissions
Limit Permissions
- Grant minimum necessary API permissions
- Use read-only keys for lookup actions
- Restrict write permissions to specific endpoints
- Monitor for unusual activity
Validate Inputs
Validate Inputs
Your API should validate all inputs:
- Check for injection attempts
- Validate data types and formats
- Limit string lengths
- Use parameterized queries
Real-World Examples
CRM Customer Lookup
CRM Customer Lookup
Scenario: Look up customer in SalesforceConfiguration:
- Method: GET
- URL:
https://api.salesforce.com/customers/{{customer_id}} - Auth: Bearer token
- Variable:
customer_id(string, required)
Create Support Ticket
Create Support Ticket
Scenario: Create ticket in ZendeskConfiguration:Agent Instructions:
- Method: POST
- URL:
https://company.zendesk.com/api/v2/tickets - Auth: Basic (email/token)
- Variables:
issue_description(string),priority_level(string) - Body:
Check Product Inventory
Check Product Inventory
Scenario: Check product availabilityConfiguration:
- Method: GET
- URL:
https://inventory.company.com/products/{{sku}}/availability - Auth: Header (
X-API-Key) - Variable:
sku(string, required, example: “PROD-12345”)