Overview
The Booking action lets your AI agents schedule appointments during live conversations. Integrated with Cal.com, your agents can check availability, present time slots, confirm bookings, and send automatic confirmations.Requires a Cal.com account and active integration. Works with Cal.com’s free tier.
How it works: The booking action provides two functions to your agent:
- Get available slots - Fetches available time slots from Cal.com
- Book appointment - Creates the booking with customer details
Setup
Create Cal.com Event Types
Set up event types in Cal.com for each appointment type:
- Duration (15 min, 30 min, 60 min, etc.)
- Meeting location (Zoom, Google Meet, phone, in-person)
- Availability windows
Test Event Types
Book a test appointment in Cal.com to verify availability, meeting links, and notifications work correctly.
Connect Cal.com
Get your Cal.com API key and connect it to itellicoAI: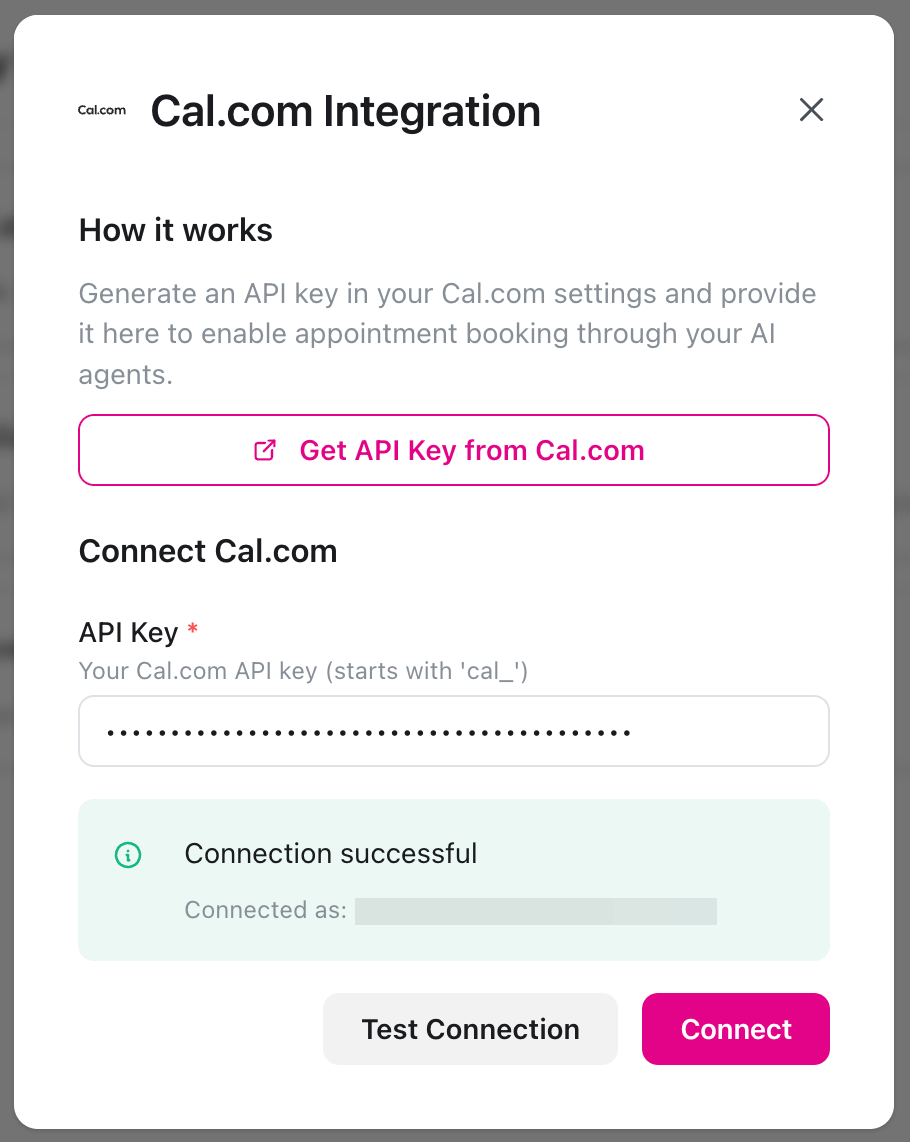
- Go to Cal.com Settings → Developer → API Keys
- Click + Add, name it (e.g., “itellicoAI”), and save
- In itellicoAI, go to Integrations → Cal.com
- Paste your API key, click Test Connection, then Connect
Using Your Existing Calendar System
A common question: “We use Google Calendar / Microsoft Outlook / Microsoft 365. Can we still use Cal.com?” Yes! Cal.com integrates with your existing calendar system to prevent double bookings and check availability across all your calendars.How It Works
Cal.com connects to your company’s calendar system (Google Calendar, Microsoft Outlook, Microsoft 365, Exchange) and:- Checks availability - Reads your existing calendar to determine when you’re free
- Prevents conflicts - Cross-references all connected calendars before showing available slots
- Syncs bookings - Adds confirmed appointments to your existing calendar automatically
- Updates in real-time - When customers book through itellicoAI, the appointment appears in your company calendar immediately
Cal.com acts as a scheduling layer on top of your existing calendar system. You continue using Google Calendar, Outlook, or Microsoft 365 as normal - Cal.com just reads availability and writes bookings to it.
Supported Calendar Systems
Cal.com integrates with:- Google Calendar - Personal and Google Workspace accounts
- Microsoft Outlook - Outlook.com and Outlook desktop
- Microsoft 365 - Business and enterprise accounts
- Microsoft Exchange - Exchange 2013, 2016, and newer
- Apple Calendar - iCloud calendar
Setting Up Calendar Integration
Connect Your Calendar to Cal.com
In Cal.com, go to Settings → Calendars and connect your calendar:
- Google Calendar: Click “Connect” and authorize Cal.com
- Microsoft Outlook/365: Click “Connect” and sign in with Microsoft
- Exchange: Click “Connect” and enter your Exchange server details
Configure Conflict Checking
Once connected, Cal.com automatically checks this calendar for conflicts. When someone tries to book with you:
- Cal.com checks all connected calendars
- Only shows times when you’re actually available
- Prevents double bookings across all systems
Multiple calendars: You can connect multiple calendars (e.g., personal Google Calendar + work Outlook). Cal.com checks all of them for conflicts and you choose which one receives new bookings.
Common Scenarios
Company Uses Microsoft 365
Company Uses Microsoft 365
Setup:
- Connect your Microsoft 365 account to Cal.com
- Cal.com reads your availability from Microsoft 365
- New bookings appear in your Microsoft 365 calendar
- Your AI agent books appointments through itellicoAI → Cal.com → Microsoft 365
Company Uses Google Workspace
Company Uses Google Workspace
Setup:
- Connect your Google Workspace account to Cal.com
- Cal.com reads your availability from Google Calendar
- New bookings appear in your Google Calendar
- Your AI agent books appointments through itellicoAI → Cal.com → Google Calendar
Team Members Use Different Calendar Systems
Team Members Use Different Calendar Systems
Setup:
Each team member connects their own calendar to their Cal.com account:
- Alice connects her Google Calendar
- Bob connects his Microsoft 365 calendar
- Carol connects her Outlook calendar
Add Booking Action
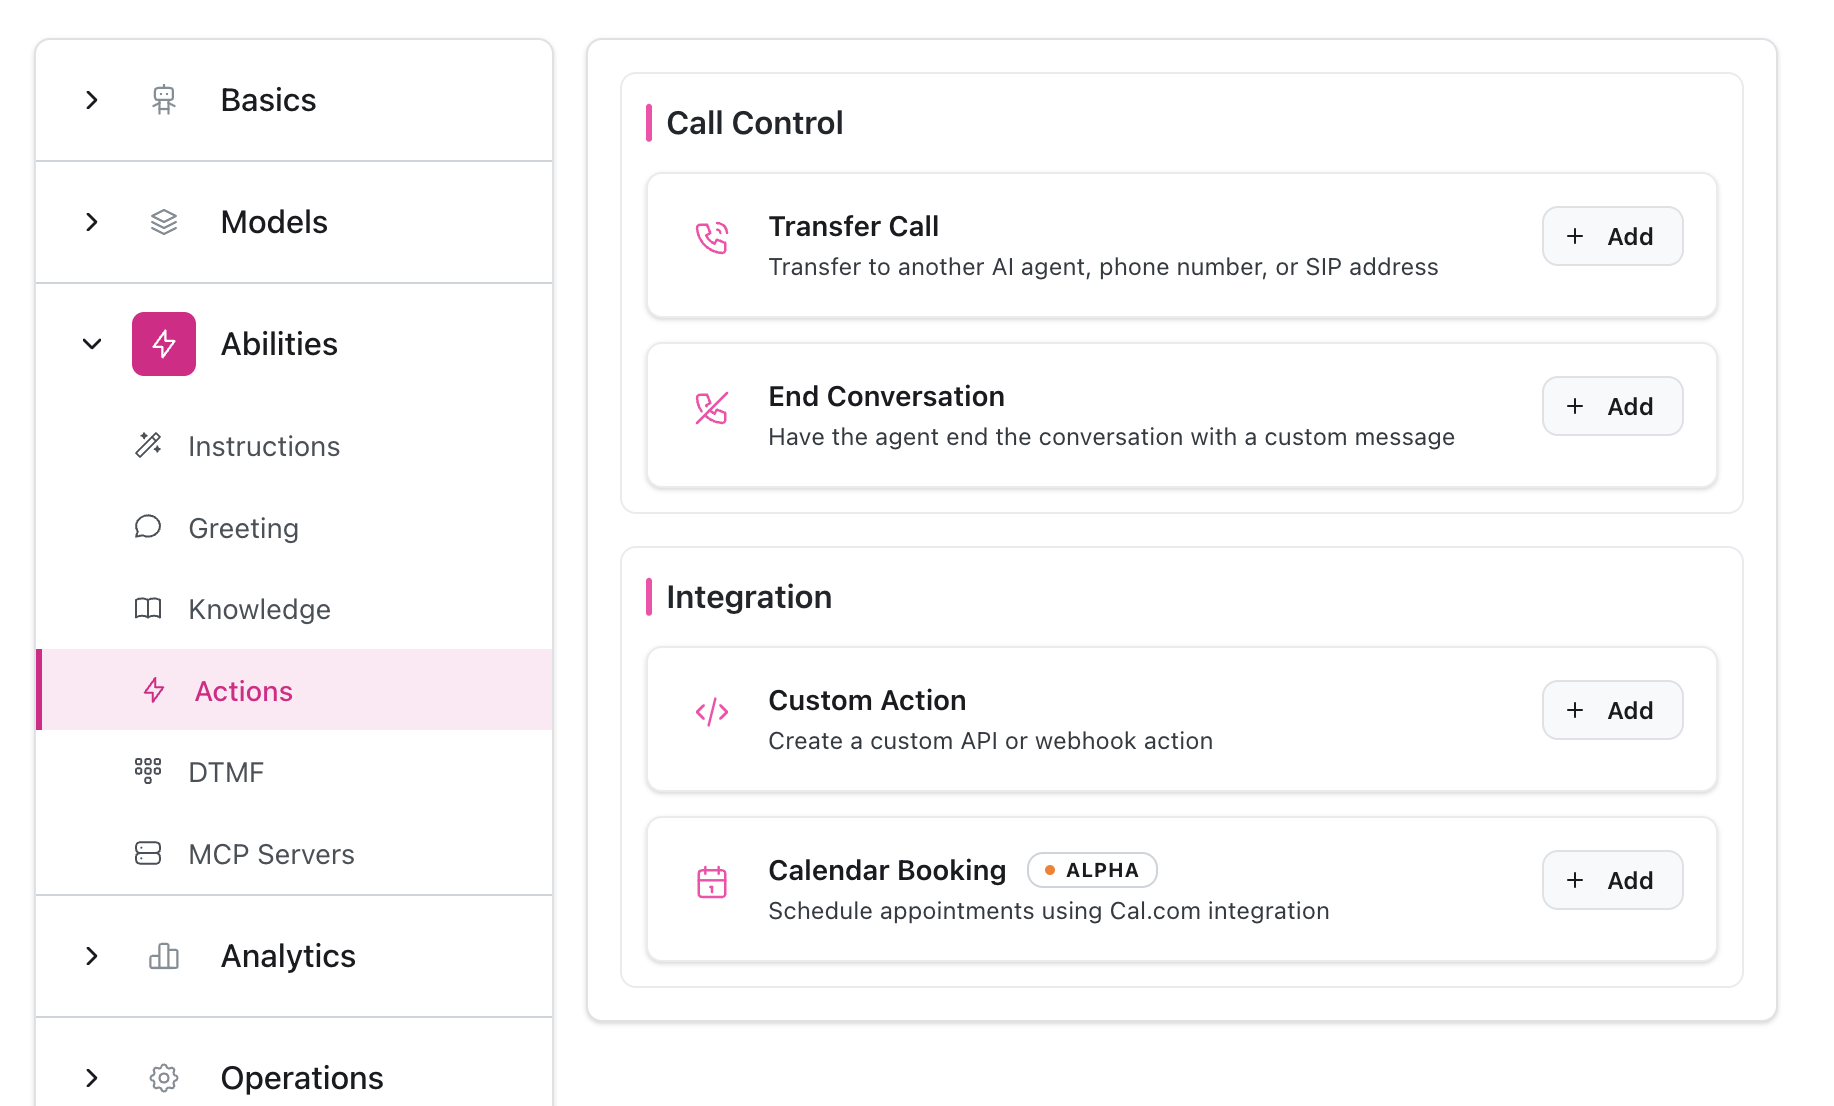
Create Action
- Go to your agent → Abilities → Actions
- Click Add Action → Calendar Booking
- Select your Cal.com event type
Configuration

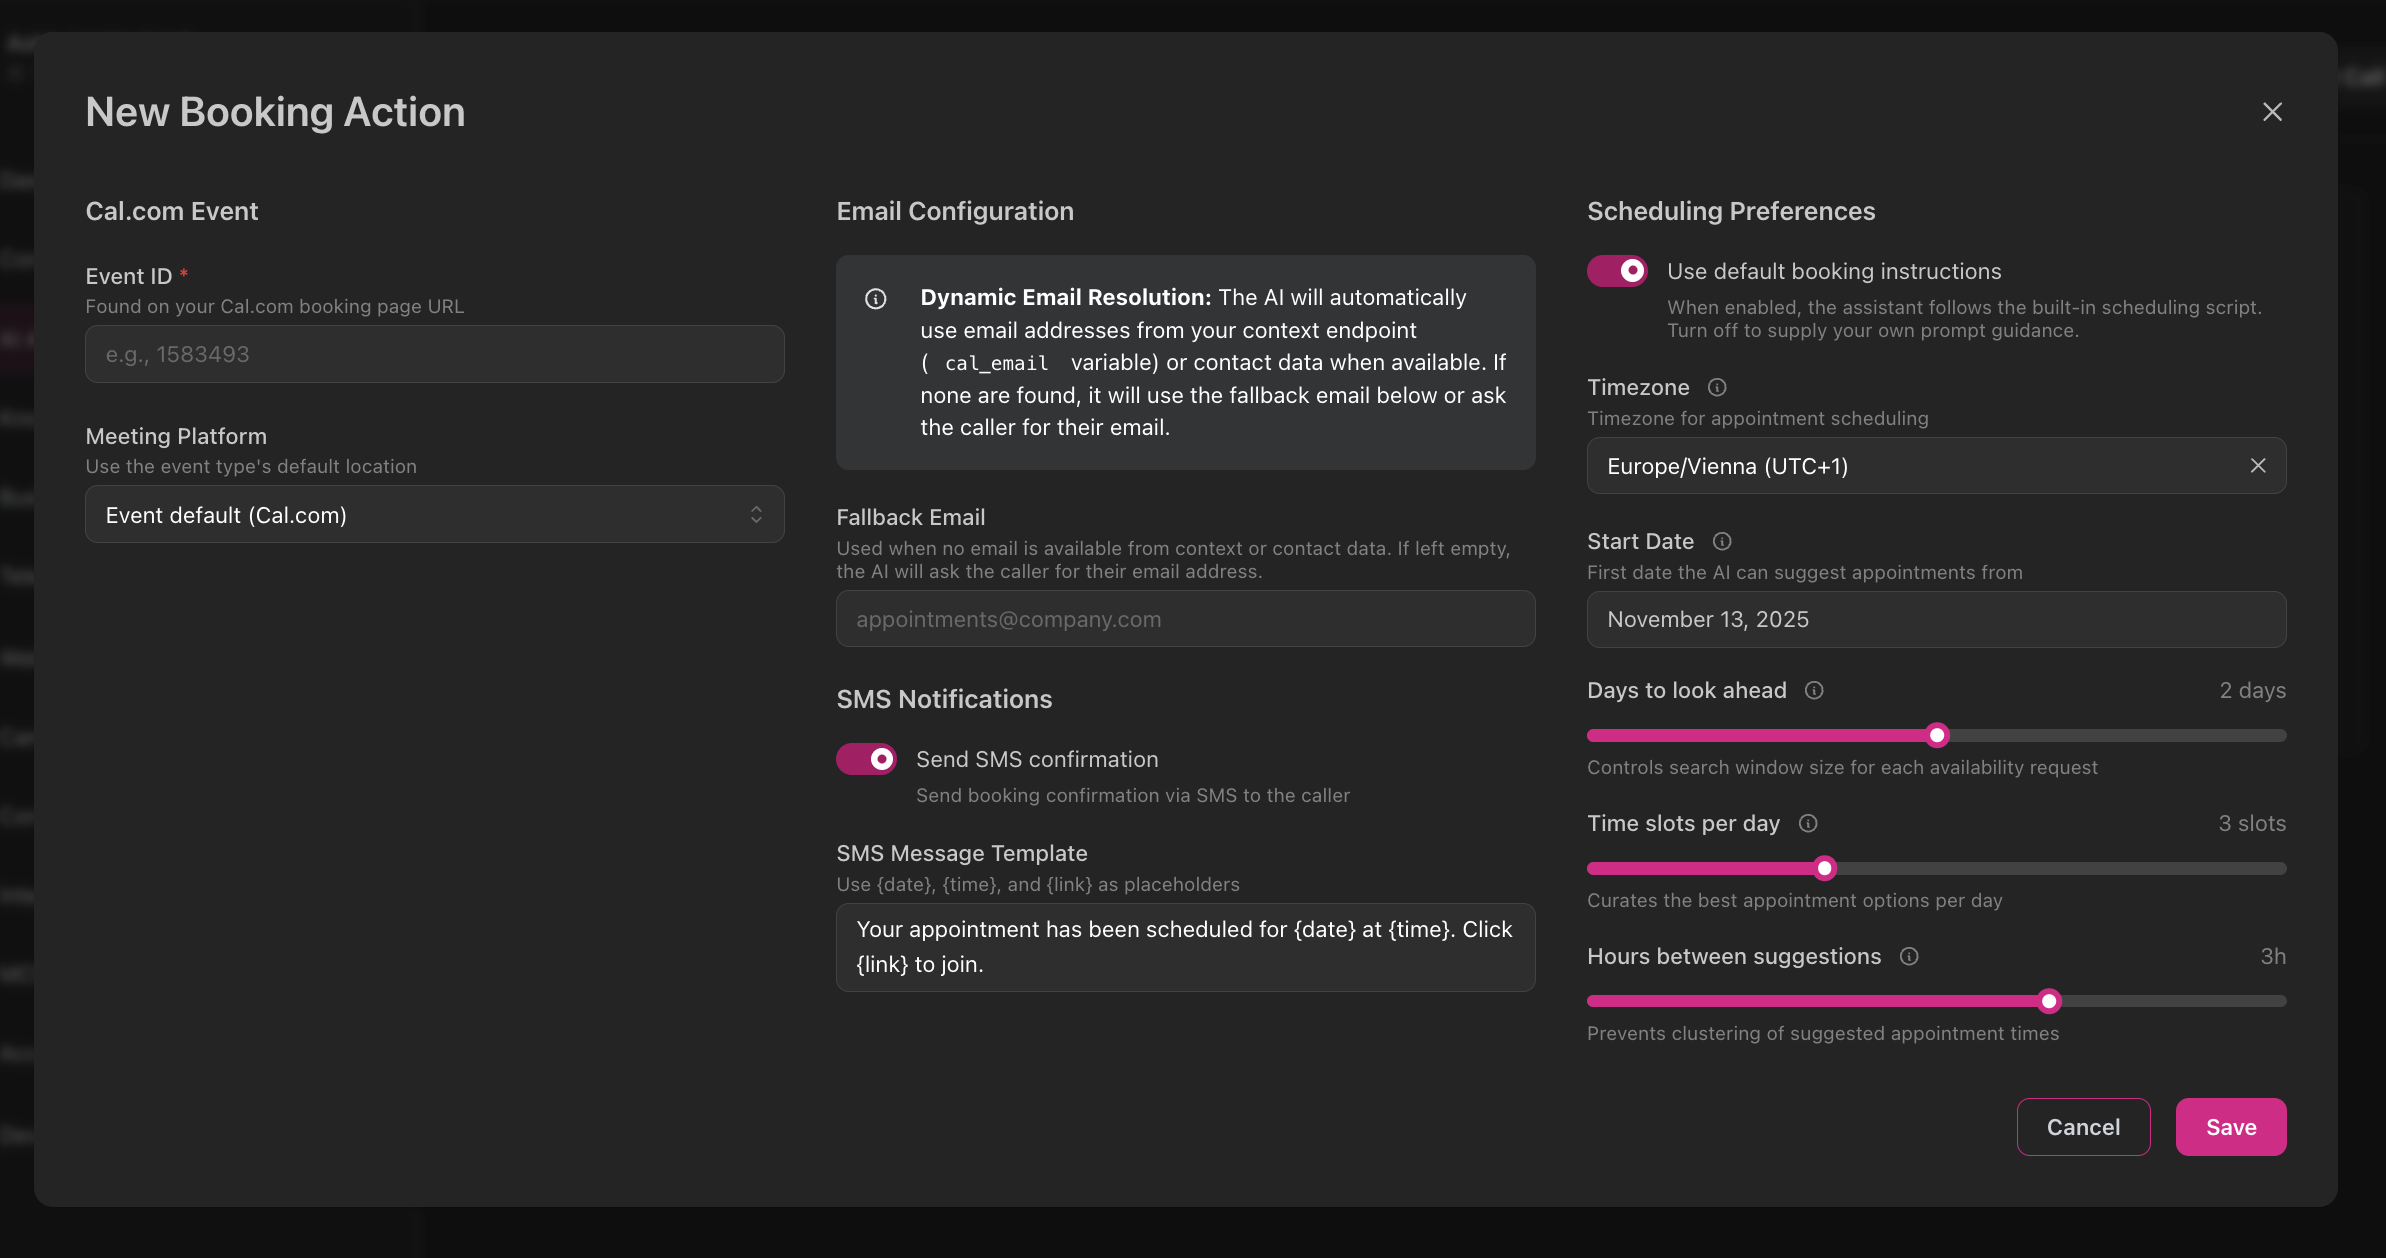
Event & Platform
Cal.com Event Type (Required)- Select from dropdown or enter event ID manually
- Each action maps to one Cal.com event type
- Choose how meetings are hosted:
- Cal Video - Built-in Cal.com video
- Zoom - Requires Zoom connected in Cal.com
- Google Meet - Requires Google Meet connected
- Microsoft Teams - Requires Teams connected
- Phone - Phone call appointment
- In Person - Physical meeting (address required)
- Defaults to your browser’s timezone (can be changed)
- All suggested times are presented in this timezone
- Searchable dropdown with all available timezones
Scheduling Preferences
Days to Look Ahead (1-3 days, default: 2)- How many future days the agent considers when finding slots
- How many time slots per day the agent offers
- Minimum spacing between suggested times
- Earliest date the agent can suggest
- Leave blank for immediate availability
Email Configuration
The agent uses this priority to find customer email:- Dynamic Context -
cal_emailfrom your context API - Contact Record - Email stored in itellicoAI contact
- Fallback Email - Team inbox (configure below)
- Ask Customer - Agent requests email during call
- Used when customer email is unavailable
- Leave blank to force agent to always collect email
SMS Notifications
Send SMS Confirmation (Default: enabled)- Sends SMS after booking completes
- Includes meeting details and join link
- Customize the message with placeholders:
{date}- Appointment date{time}- Appointment time{link}- Meeting link{location}- In-person address{duration}- Meeting duration
- Pre-built scheduling script for the agent
- Disable only if you need more control over the booking conversation flow
Scheduling for Multiple Employees
A common scenario: “We have 3 employees who can handle appointments, each with different availability. How do we schedule across the team?” Solution: Use Cal.com Teams with Round Robin scheduling. This distributes appointments across team members based on their individual availability.What is Cal.com Teams?
Cal.com Teams allows you to create event types that can be handled by multiple team members. Instead of booking with a specific person, customers book with your team, and Cal.com automatically assigns the appointment to an available team member.Cal.com Teams requires a Teams or Organization plan. The round robin feature intelligently distributes appointments based on availability, priority, or rotation.
How Round Robin Works
When a customer books an appointment:- Checks availability - Cal.com checks each team member’s calendar
- Applies distribution logic - Selects the best team member based on your chosen method:
- Priority: Assign to higher-priority team members first
- Weighted: Distribute proportionally (e.g., senior staff get more bookings)
- Least recently booked: Rotate evenly by who was booked least recently
- Books with one person - Customer gets scheduled with the selected team member
- Updates calendar - Appointment appears in that team member’s calendar
Setting Up Team Event Types
Create a Team in Cal.com
In Cal.com:
- Go to Teams → Create Team
- Name your team (e.g., “Sales Team”, “Support Team”)
- Invite team members by email
- Each member connects their own calendar (Google, Microsoft, etc.)
Create Team Event Type
In your Cal.com team:
- Go to Event Types → New Event Type
- Select Round Robin as the event type
- Configure duration, meeting platform, etc.
- Select which team members can handle this event type
Configure Distribution Method
Choose how appointments are distributed:Priority Ranking:
- Assign each team member a priority (High, Medium, Low)
- Higher priority members get bookings first
- Use for senior staff or specialists
- Give each member a weight percentage (default 100%)
- Higher weights = more bookings
- Use for part-time vs full-time staff
- Automatically rotates through team members
- Ensures even distribution
- Use for equal workload sharing
Advanced: Fixed + Round Robin Hosts
For scenarios where one person must always attend, while others rotate: Example: Sales calls need a sales rep (rotating) + sales manager (always present) Setup in Cal.com:- Create round robin event type
- Select Fixed Hosts: Sales Manager (always attends)
- Select Round Robin Hosts: Sales reps (one attends per call)
- Cal.com checks availability for both and books when both are free
Team Scheduling Examples
Sales Team: 3 Reps with Equal Distribution
Sales Team: 3 Reps with Equal Distribution
Scenario: 3 sales reps should share demo calls equallySetup:
- Create team “Sales Team” with 3 members
- Use Least Recently Booked distribution
- Each rep connects their calendar to Cal.com
- Create event type “Sales Demo” (30 min, round robin)
Support Team: Priority-Based Assignment
Support Team: Priority-Based Assignment
Scenario: Senior support staff should get complex issues, junior staff get routine issuesSetup:
- Create event type “Technical Support Call” with priority distribution
- Senior staff: High priority
- Junior staff: Medium priority
Part-Time Team: Weighted Distribution
Part-Time Team: Weighted Distribution
Scenario: 2 full-time employees and 1 part-time employeeSetup:
- Full-time staff: 100% weight each
- Part-time staff: 50% weight
- Use weighted distribution
Multi-Role Meetings
Multi-Role Meetings
Scenario: Customer needs both a technical specialist and account managerSetup:
- Use Round Robin Groups (advanced feature)
- Group 1: Technical specialists (one attends)
- Group 2: Account managers (one attends)
Team Integration with itellicoAI
When you connect a Cal.com team event type to itellicoAI:- Your AI agent books with the team - Not a specific person
- Cal.com handles assignment - Automatically selects the best team member
- Customer gets confirmation - With the assigned team member’s details
- Team member’s calendar updates - Appointment appears in their individual calendar
Flexibility: Team members can update their individual Cal.com availability, and the round robin automatically respects those changes. No need to update anything in itellicoAI.
Using in Instructions
Reference the action by its auto-generated name (e.g., “Book 30-Minute Consultation”) in your agent instructions:The action name is automatically generated from your Cal.com event type title (e.g., “30-Minute Consultation” becomes “Book 30-Minute Consultation”).
Handle Booking Failures
Testing
Verify Integration
- Cal.com integration shows “Connected”
- Event types appear in dropdown
- Meeting platforms configured in Cal.com
Test Booking Flow
- Start test call with your agent
- Request appointment booking
- Verify agent presents available times
- Confirm booking completes
Check Confirmations
- Email confirmation received
- SMS confirmation sent (if enabled)
- Meeting link works
- Calendar updated
Troubleshooting
Booking Action Not Appearing
Booking Action Not Appearing
Cause: Cal.com not connectedSolution:
- Go to Integrations → Cal.com
- Verify status shows “Connected”
No Event Types in Dropdown
No Event Types in Dropdown
Cause: No event types in Cal.com or sync issueSolution:
- Create event types in Cal.com
- Disconnect and reconnect integration if needed
Meeting Platform Disabled
Meeting Platform Disabled
Cause: Platform not connected in Cal.comSolution:
- Go to Cal.com event type settings
- Connect the platform (Zoom, Google Meet, etc.)
- Disconnect and reconnect integration to sync changes
Email Confirmation Not Received
Email Confirmation Not Received
Possible causes:
- Wrong email address
- Spam folder
- Cal.com email settings
- Check spam/junk folder
- Verify email in booking confirmation
- Check Cal.com notification settings
Agent Doesn't Use Action
Agent Doesn't Use Action
Possible causes:
- Action name not referenced in instructions
- Agent doesn’t recognize booking intent
- LLM model not performing well with function calling
- Reference exact auto-generated name (e.g., ‘Book 30-Minute Consultation’)
- Check the Actions tab to see the actual name
- Verify action is added to the agent
- Add explicit booking flow to instructions
- Test with clear: “I want to book an appointment”
- Try GPT-4.1 or GPT-4.1-mini for most reliable function calling
- Reduce temperature for more consistent behavior